Views, history and recipes from a pastry chef living and working in London.


"The fine arts are five in number, namely: painting, sculpture, poetry, music,
and architecture, the principal branch of the latter being pastry." Antonin Carême (1783-1833)

Thursday 19 August 2010

Pannacotta & Jelly

Pannacotta, literally translated as "cooked cream" is an Italian dessert from the north of Italy in places such as Piedmont where it is traditionally known as an agricultural food product. Traditionally thickened with either fish bones, egg whites or, nowadays, gelatin, this creamy, extremely rich dessert is said to have been invented by a Hungarian lady in the Langhe area.

It will have been very heavy cream, boiled slowly with lots of sugar and eggs to create that thick almost custard like consistency. Regional variations suggest that anything from rum to Marsala will have been added to give the final pannacotta that extra kick. Pannacotta is classically served with either caramel sauce, poached or stewed fruit or with compotes or coulis.

Jelly
We have records, of jelly like concoctions being eaten as far back as Egyptian times. It is mentioned in Anglo-Saxon recipe books and was a great favourite at banquettes of the likes of Henry VIII

But it was the Victorians who really first played with the endless possibilities that gelatin offers. Jellies were considered quite a luxury as gelatin was quite expensive. This was due to the fact that it had to be purified before use, from sheet form which was extremely time consuming.

Jelly also uses gelatin as its main setting ingredient. Gelatin, in its commercial form, is a brittle, tasteless solid substance, sold in leaves of crystals. It is derived from collagen, a substance found in the skin, bones and connective tissue of animals. This may sound pretty disgusting but its worth noting that gelatin is found in many things we come into contact on a day to day basis. Not only is it found in many food stuffs but it is also widely used in pharmaceuticals, photography, and cosmetics.

It was in 1845 that an American industrialist named Peter Cooper, the man who built the first American steam train, applied for and received US Patent 4084 for powdered gelatin, did it become more widely and readily available.

On the other side of the pond in 1862 in York, a man named Henry Isaac Rowntree first founded the Rowntree sweet company (now known as Hartley's) which was to play a major part in Jelly in the UK from then on.

In 1897, the Patent was bought by a Cough syrup family manufacturer called Waits, in New York. They added flavourings and fruit concentrates to the crystals and created what is now known in the US as Jell-O. The product failed dismally and was then sold on to the Woodward's Genesee Pure Food Company who, in 1904, started distributing large quantities of "the Jell-O Cookbook. This signalled the beginning of the success of Jell-O.

In 1923 Rowntrees started producing their own version of the American success story that was Jell-O, but it was in 1932 that they pioneered the brightly coloured , highly concentrated, "just add water" jelly that we all know and love.

In America by the 1930's Jell-O was a household name. They even brought out a few savoury version for use in salads and on  vegetables, (sounds revolting to me).

Nowadays Jelly is as popular as ever with Jell-O boasting a huge 158 products on the US market. They sell approx 300 million boxes of gelatin a year.

So here's my version of jelly with an added "la,di,da," pannacotta to give it depth and creaminess. I admit it does look like a bit of a mission but i promise you its easy peasy. Once its all set you can serve it at a dinner party with the hole on the bottom so it just looks like your average clementine. Trust me the reaction when people cut into it is worth the effort.

Pannacotta
  • 600g double cream
  • 150g milk
  • 200g caster sugar
  • 5 gelatin leaves
  • 2 tbsp rum
  • 1 vanilla pod
Clementine jelly
  • 8 clementines (400ml, you can top it up with orange juice)
  • 100ml elderflower
  • 50g sugar
  • 7 gelatin leave 
  • juice 1 lime

OK so mix your cream with your milk, sugar and vanilla and bring to the boil. Soak your gelatin leaves in cold water for a few minutes till they're soft.

Once boiled remove the cream from the heat and whisk in your gelatin leaves and your rum. Sieve into a bowl and place to one side.

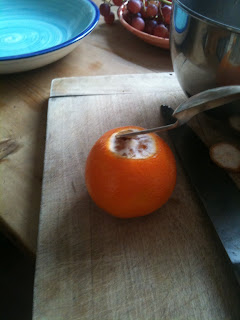
Now for the clementines, this is easier than it sound. Place a clementine on a chopping board and carefully cut the top off so you expose approx 1cm diameter hole in the top. With a teaspoon, gently slide the handle into the clementine and down the inside of the skin being careful not to puncture the skin. Continue doing this all round the clementine until you've done a full circle. Next gently prise the segments out of the hole, this will take a while but its easy once you've got the hang of it. Once you've done all 8, give them a good rinse and make sure there are no pithy bits in the cavity. Take the segments and pulp and blitz in a food processor or pass through a sieve. You need 400ml juice so top it up with orange juice if required.

Sieve that into a pan and add the sugar, elderflower and lime juice. Soak your gelatin leaves as before. Place the pan on the heat and once brought to the boil remove, whisk in the gelatin and sieve into a bowl.

So this is where it
gets interesting. Depending on what kind of effect your looking for will determine what size spoon to you. Here I went for a dessert spoon however i think next time i do it I'll go for a teaspoon so I get more stripes.. So pour a teaspoon of jelly into the bottom of each clementine and place in the freezer. This should take no more than 15 mins to set, if that. Remove and repeat the process with the pannacota mix. Its best to keep both mixes as liquid as possible, this way when you pour them in they will find their own level. Make sure each layers flat before placing it in the freezer.

Once your clementines are full, take out of the freezer and wipe down the outsides. Then place in the fridge and serve with a sharp knife, hole side down, whenever required.
Enjoy

Thursday 29 July 2010

Financier, Bagels and Pickles

Apologies for the large gap between posts. A combination of work and spending several days on pastry at the three Michelin Star restaurant The Fat Duck in Bray (what an experience) has meant I have been unable to get to my computer. We have a few things for you today so here goes.
Financier

Financiers are small French teacakes usually consisting of ground almonds, egg whites, icing sugar and burnt butter or beurre noisette. These gorgeous cakes are chewy on the outside and moist on the inside with the almonds and beurre noisette giving them a delicious nutty flavour.

The name Financier is said to have originated from the small, bar shaped moulds they are traditionally cooked in, and how these resemble gold bar. Another theory is that the name came from a French pastry chef called Lasne in the late 19th Century who owned a shop near La Bourse du Commerce, otherwise known as the French stock exchange. His idea was to create small cake for the “on the move” bankers that could be eaten without the use of a knife and fork and that didn’t include any fruit or jam that could potentially cause a mess.

I usually make large batches of financier mix, which can be kept in the fridge and brought to room temperature when needed. Both mixes below will keep for a week in the fridge. The financier mix can be piped into any mould and topped with any fruit, chocolate, jam or anything else. It’s a really diverse mix that can be used with anything.

My version involves injecting orange chocolate ganache into the centre of these just baked pastries, which means they have a molten chocolate center. We used to make these as a breakfast starter at a Michelin Hotel in Norfolk. They are super easy to make and can be knocked up as an evening snack or used as a petite four when entertaining.
Financier mix
110g ground almonds
60g icing sugar
25g plain flour
3 egg whites
25g golden syrup
150g butter
1 vanilla pod
Place butter in a pan and bring to boil. Whisk constantly until the butter takes on a nutty brown colour and smell. Remove from heat, whisk in golden syrup and sieve into a bowl. Place almonds in another bowl and mix in the flour, vanilla seeds and caster sugar. Add the egg whites and beat till smooth, then slowly add the burnt butter and golden syrup and beat till amalgamated.

Orange chocolate ganache
zest 1 orange
40g milk chocolate
25g dark chocolate
65ml double cream
25g golden syrup
1tbsp cointreau
10g butter

Bring the cream, orange zest and golden syrup to the boil, remove from heat and pour over the chocolate. Whisk slowly until all the chocolate has melted. Whisk in the cointreau and finally the butter. Set aside, whisking regularly, till the mix has thickened slightly. Spoon into a piping bag and set aside.

Pipe the financier mix into buttered muffin tins approx ¾ full. Place in the oven at 180c for approx 10 minutes until cooked. Remove from the oven and transfer to a rack to cool. Once they are cool enough to touch, puncture the top with the piping bag and pipe as much chocolate ganache as possible into the centre of the financier. Dust with icing sugar and serve. DELICIOUS.

Blueberry bagels

Ok, so having a beautifull American girlfriend means that I'm constantly being introduced to new foodie things. One of these things, that I've never really been a fan of, is the humble bagel. Very popular in America it seems to have had less exposure over here and I had never really given it a huge amount of attention. This has recently changed, after eating a home made bagel that she had made we both floured up one Sunday afternoon and she taught me how to make bagels. DELICIOUS!

The origins of the bagel are still up for discussion but there are 2 main theories.

The first is said to have come from Vienna in the late part of the 1600's when a local Jewish baker baked a yeast based bread ring as a present for the King of Poland for protecting his countrymen from the invading Turks. It was fashioned into the shape of a stirrup to commemorate the king's favorite pastime.

Some argue that, contrary to common legend, the bagel was actually invented much earlier in Kraków, Poland. It was said to have evolved from a lean bread of wheat flour, designed for Lent, known as a bublik. Whatever its origins, the bagel became a staple of the Polish national diet by the end of the 17th century as there was a tradition among many observant Jewish families to make bagels on Saturday evenings at the conclusion of the Sabbath. Due to Jewish Sabbath restrictions, they were not permitted to cook during the period of the Sabbath and, compared with other types of bread, bagels could be baked very quickly as soon as it ended.

The Bagel was first brought to the United states by Eastern European Jewish immigrants where it was an immediate success in New York and New Jersey. The thriving business developing in New York City was controlled for decades by Bagel Bakers Local 338, which had contracts with nearly all bagel bakeries in and around the city for its workers, who prepared all the bagels by hand.

However it wasn't until the 1960's when Bagel Baker called Harry Lender pioneered automated production and distribution of frozen bagels that the bagels popularity really took off and spread across the US.

Below is my girlfriends recipe for blueberry bagels (sorry it's in American). The main difference between these and any other yeast bread based product isthat they are blanched in boiling water before being baked. This gives them that signature chewy, heavy texture which is so good for toasting. They can get a bit fiddly and always seem to come out a weird shape but trust me they are worth the effort. Enjoy.

Homemade bagel recipe
4 cups white read flour
1 Tbsp sugar
1 1/2 tsps salt
1 Tbsp vegetable oil
2 tsps instant yeast
1 1/2 cups of warm (not hot) water.

Mix all the ingredients in a bowl until you get a firm but smooth dough. Place on a clean floured work surface and knead for 10 minutes.

Cut the dough into 8 equal sized balls, place on floured surface, cover with a towel and rest for 10-20 minutes.

Take each ball and roll into a snake, join both ends and roll till you get a doughnut shaped even ring. Place on a floured tray and dot with blueberries. Allow to rest in a warm place until the doughnuts have doubled in size and feel spongy. This could take half an hour.

Bring a large pan of water to the boil and once the bagels have risen, drop two at a time into the water. Boil a minute on each side then remove from the water and pat dry with a tea towel.

Once all your bagels have been boiled place in an oven at 180 c for 10 minutes or until golden. Remove, flip over and repeat.
Remove from the oven and allow to cool for 10 minutes. slice and serve toasted with cream cheese.


Killer Dillers

Ok so technically this is supposed to be a pastry blog. That’s kinda what I do, but I do have an interest in jams, preserves and pickles among other things.

On a recent trip to Brighton I stumbled upon a shop selling baby nobly cucumbers. Now, I LOVE dill pickles and having purchased a load I figured why not try and make a few batches for presents and post it to show you all how its done. It has to be the easiest thing to make in the world, and one of the most delicious.

I spent hours and hours researching how to make the best dill pickle. I sifted through alot of recipes and methods, there are thousands online, to try and come up with a good all rounder, and this is what i came up with. Its a combination of several recipes and seems to work REALLY well. You will need a 1.5litre kilner jar or several smaller jam jars as well as:

Dill Pickles
1kg baby pickling cucumbers (normal cucumbers sliced)
500ml water
500ml white wine vinegar
2 heaped desert spoons salt
6 heaped desert spoons sugar
2 heaped desert spoons mustard seeds
1 tsp black pepper corns
1 tsp white pepper corns
1 tsp red pepper corns
2 tsp coriander seeds
4 large cloves garlic
2 bunches dill
4 pimento all spice berries
First off you need to place the cucumbers in a large pot (or the kitchen sink) and cover them with cold water, lots of ice and lots of salt. This brine draws out some of the moisture from the cucumbers and makes them crunchy, otherwise your left with a soft pickle. Leave them in this solution for no less than 2 hours no more than 8.

Then you need to sterilise your jars and lids by placing them in a pan of boiling water and simmering them for 10 minutes or, like I do, filling them with boiling water from the kettle.

Once this is done take your rinsed cucumbers and pack them into your jars with the garlic and the dill, as tightly as you can. Next place the rest of the ingredients into a pan and place on the stove. Bring to the boil and pour over your cucumbers making sure they are covered. You can place the sealed container back into boiling water and simmer for a further 10 minutes, this will pasteurised the mix and add more shelf life to the product. This is optional and best if you plan to keep the pickles out of the fridge, i didn't bother.
 
So that's it, give them a few months and serve with cold meat, sliced on burgers or just as a snack. Mine have been going 2 weeks now and they smell amazing but you must resist temptation.

ENJOY.

Tuesday 22 June 2010

Elderflowers

Elderflowers, Sambucus nigra, is a species of shrubs, one of thirty Sambucus trees in the moschatel family. A relative of honeysuckle it is native to Europe, North Africa and Northern America. The small white flowers appear in large heads, approx. 10–25 cm diameter, in midsummer and the fruit appear in late autumn as dark purple berries that hang in large clusters. The ripe berries are used to make all sorts of condiments including jam, jelly and wine whereas the under ripe berries are mildly poisonous.

The flowers are mainly used to make an infusion or cordial which is popular all across Northern Europe and the Balkans. It is known as Socata in Romania and Fladersaft in Sweden. These are all diluted before drinking. The fresh flowers are also dipped in a light batter and fried to make a elderflower fritter and in Scandinavia and Germany the berries are sometimes made into soup.

The elderflower berries and flowers have also been used for many centuries for their medicinal qualities. The stems, berries, flowers and root have been used to treat coughs, bronchitis and infections. In Russia, elderflowers are still sold in drugstores to relieve congestion. The dried flowers are simmered to make a weak tea which is taken when ill.

Here are a few things you can do with elderflowers this summer. They are out in force in the south and appear to have not yet kicked in in the North. Favored by jam makers and foragers alike their perfumed flowers are a real reminder of summer that can be bottled and jarred to keep you feeling summery all year round. Enjoy.

 
Elderflower and bramley apple jelly
  • 6lb cooking apples
  • 6 pints water
  • 2.5lb (approx. 5kg pectin / jam sugar)
  • 5 lemons
  • 40 elderflower heads
This jelly has a beautifully subtle hint of the perfume of elderflowers whilst having the tart astringency of the bramley apples. It goes great with cold meats and pies.

Quarter apples and place in a large plan with quartered lemons and cover with water. Bring to boil, turn down and simmer for approx. 1 hour until the apples are soft and pulpy. Strain through muslin or a fine seive over the elderflower heads. Allow to stand overnight. Strain through a fine sieve to remove flowers and for every pint of liquid add 1lb pectin sugar. Place on heat and bring to boil. Boil hard till you reach setting point skimming off any scum that forms on the top. To check for set, pour teaspoon of liquid onto frozen saucer and place in freezer for a few minute. Run your finger through the jelly and if you leave wrinkles either side of your finger you have reached setting point. Pour into sterilised jars and allow to cool.
Elderflower Cordial
  • 3lb Caster sugar
  • 3 pints water
  • 2 split lemons
  • 25 elderflower large heads
  • 2 oz citric acid
This is a real winner. Really easy to make, tastes great just diluted with water or lemonade on a hot summers afternoon or used as a topping for ice cream and strawberries. It can easily be turned into a frozen sorbet and can be added to cava or other spirits for a refreshing evening drink.
Place sugar and water in a pan with split lemons and bring to the boil. Pour over the elderflower heads and cover. Leave in a cool dark place for 5 days stirring every day. After 5 days run through a fine sieve or muslin to remove all the flowers and stir in citric acid. Pour into sterilised bottle (pour boiling water into old screw top wine bottles) and store in a cool place.

 
Enjoy.

Sunday 6 June 2010

Marshmallow

The marshmallow plant (Althaea officinalis ) is a fleshy marsh reed, commonly found in Europe, Western Asia and Northern America. It consists of an upright stem, consisting of five lobes (3-4 feet in height), a pale, fleshy root and short stemmed leaves. The stem and leaves are covered by a velvety, downy material similar to those found on bull rushes. They have a 5 petal reddish flower. The roots and the leaves of the marshmallow contain a gel like substance called Mucilage.
The Marshmallow has been used as source of food and a form of medicine for over 2000 years and can be traced back to the ancient Egyptians. They mixed the Mucilage with water, creating a thick gel like substance which was commonly used to treat sore throats. In Arab countries the leaves were made into a poultice, a soft moist mass of crushed leaves, that was applied to the skin to reduce inflammation.

The Egyptians were the first on record to use the marshmallow as a food stuff. They extracted the mucilage sap from the root and mixed it with nuts and honey. They are also known to have stripped the skin from the stem, exposing the soft spongy pith within the stem which was boiled with sugar and then dried to produce a soft chewy sweet.

These methods were used all the way up to the 19th century when French sweet makers devised a way of whipping up the sap and sweetening it, and so the modern marshmallow was born. This method was adopted by individual sweet producers who produced marshmallows on a small scale in house. However, despite it being very successful and hugely popular it was still very time consuming extracting the sap from the marshmallow.
In the late 19th century the French realised the same effect could be produced by using a combination of egg whites, sugar and corn starch, without the laborious task or processing the plant.

In 1948 and American called Alex Doumak patented a way of producing marshmallows which gave them the cylindrical shape we know today. The machine forces the whipped mix through tubes, de-molding them once they’re set and cutting them into cylinders. The National Confectioners Association of America estimate that Americans spend more than $125 million on marshmallows every year, that’s the equivalent weight of 1286 grey whales.

Here’s one of my marshmallow recipes tweaked for the summer. I’ve used geranium water which gives them a lovely perfumed flavour but you can use orange blossom or even rose water depending on what you have in the cupboard or what takes your fancy. The raspberries do mean that the shelf life is reduced slightly as the raspberries tend to “bleed” after a while but trust me, they won’t be around last long enough for this to be a problem.
Geranium scented raspberry marshmallows 
  • 120g (3) egg whites
  • 500g caster sugar
  • 100ml geranium water
  • 100g water
  • 2 oranges zested
  • 50g glucose
  • 9 gelatine leaves
  • 1 punnet raspberries
  • corn flour to dust
Place the sugar, glucose, water and geranium water in a pan and bring to the boil.
Place the gelatine in cold water to soften.

Place the egg whites in a mixer bowl and whisk to soft peak. Take the sugar syrup up to soft ball approx. 120 Celsius. This can be achieved with a sugar thermometer or by dropping syrup into a glass of cold water. What you’re looking for is that the syrup does not dissolve in the water but forms small soft balls or ribboin the water. Once you’ve reached that stage slowly pour the sugar syrup down the side of the bowl into the egg whites whisking all the time. Continue whisking hard. You will notice that the mix will get stiffer and stiffer as the sugar and gelatine set the mix. The aim is to get as much air into the mix before it sets.

Once you’ve reached the point where the mix is very thick but still pourable pour half into a cling film and corn flour dusted tray. Dust the raspberries with a little corn flour (to stop them bleeding) and scatter over the mix. Drop a couple of drops of pink food colour or cochineal into the remaining mix and whisk to colour then pour over the raspberries, smooth down and place in fridge till set. Once set remove from tin, peel off corn flour and cut into chunky pieces, roll in corn flour and dust off as much as you can by rolling between your hands.

Enjoy

Thursday 27 May 2010

Chocolate

Chocolate

"All you need is love.
But a little chocolate now and then doesn't hurt".


Chocolate comprises a number of raw and processed foods produced from the seed of the tropical Theobroma cacao tree. The seeds of the cacao tree have an intense bitter taste which are fermented to develop the flavor.

After fermentation, the beans are dried, cleaned, and roasted, and the shell is removed to produce cacao nibs. The nibs are then ground to cocoa mass, pure chocolate in rough form. This mass may be processed into two components: cocoa solids and cocoa butter.

The origins of chocolate can be traced back to the ancient Aztec and Mayan people. The Cocoa beans were prized by the Maya Indians as far back as 600 AD. They roasted and added them to chili and other spices to make a drink called Xocoatl, bitter water.

It was not until 1517, when the Spanish conqueror Hernan Cortés sent an expedition to colonise Mexico, that chocolate was first imported to Europe. By 1520 the Spanish, led by Cortes, had defeated the Aztec civilisation,
and in 1528 he returned to Spain bringing cacao with him. Soon 'chocolate' was all the rage amongst the Spanish elite who preferred it without chilli and to be served warm, hence “hot chocolate.”

Gradually chocolate spread across Europe with the Italians and the French setting up cocoa plantations in Cuba and Haiti by 1684 but it wasn’t till 1653 that chocolate finally hit England. It immediately became a hit with Charles II and in royal circles and in 1657 London’s very first Chocolate House was opened in Bishopsgate Street.

During the 18th Century the French produced chocolate pastilles (tablets), but it wasn’t until 1847 that Bristol company Fry & Son mixed cocoa powder with sugar and melted cocoa butter to produce the first moulded “chocolate bar”.

In 1875, a Swiss manufacturer called Daniel Peter added powdered milk to make the first milk chocolate bar. Unfortunately, up to this point, chocolate was course and grainy and would not have had the same melting properties that it has today. It took the mistake of Rodolphe Lindt in 1879 to rectify this when he accidentally left a mixer, containing chocolate, running overnight. This method is called conching. It’s a method still used today and it refines the chocolate, giving it the smooth texture.

Finally in 1905 Cadbury launched the world-famous Dairy Milk bar and chocolate developed.

Here are a few of my favourites. Two of them are extremely simple. The cake and fondant are a little more complicated but well worth the extra effort for that special occasion.

Seriously thick, spicy hot chocolate

-100g dark chocolate
-200ml milk
-100ml double cream
-1 tbsp caster sugar
-1 vanilla pod
-1 pinch ground ginger
-1 tsp honey
-1 tsp ground cinnamon
-1 fresh red chilli split

Place milk, cream, honey, sugar, chilli, cardamom, cinnamon, vanilla and ginger in a pan and bring to the boil. Switch of heat and allow to infuse for 10 minutes. Bring back to the boil and pass through a sieve over the chocolate. Whisk until chocolate melted and mix is emulsified. Serve warm with whipped cream, mmm.

Simple chocolate truffles

-453g dark chocolate
-173ml cream
-75ml rum

Bring cream and rum to boil and pour over chocolate. Stir and leave for 5 minutes then whisk until emulsified and glossy. Pour into a cling film lined mould of desired thickness and set in fridge. Once set cut into desired shape and dust in cocoa.

Chocolate cake


-370g dark chocolate
-250g butter
-5 large free range eggs separated
-200g soft brown sugar
-70g caster sugar

Line a 20cm cake tin with greaseproof paper. Melt the butter in a pan then reduce the heat and add the chocolate, stir until completely melted.

Place the egg whites in a bowl and whisk to soft peak, slowly add the caster sugar and whisk to hard peaks.

Place sugar in a pan with enough water to wet the sugar and bring to the boil.

In a large bowl whisk the egg yolks, slowly add the chocolate and butter mix and whisk well. Then slowly pour in the sugar syrup whisking all the time. Finally fold in the egg whites. Pour a third of the mix into the cake tin and bake at 170 Celsius for 40 minutes by which point it will have risen up quite a bit.

Test with a skewer, which should come out hot. Allow to cool completely, then flatten the top of the cake with a knife, push down hard so your left with a flat surface. Pour the rest of the mix onto the cake, flatten down with a hot knife and return to the oven for 15 minutes until top had set. Allow to cool completely the de-mould and slice.

Chocolate and Roquefort fondant

An strange combination but seriously moreish. Please give it a go, its really worth the extra effort. I tried this whilst working in a 1 Michelin star restaurant. Everyone was very hesitant at first but it went down an absolute storm.

Ganache
-168g cream
-88g water
-25g caster sugar
-107g chocolate
-45g butter
-150gh Roquefort

The day before you make these, bring the cream, water and sugar to the boil. Add the cheese and whisk till melted. Pass through a sieve over the chocolate and mix to melt. Finally whisk in the butter and pour into a container so that mix is approx 2cm deep. Place in freezer.

Sponge

-165g chocolate
-4 eggs
-4 egg yolks
-55g flour
-65g ground almonds
-135g sugar
-80g butter

Whisk the eggs, egg yolks and sugar until light and fluffy. Melt the chocolate and the butter and mix into eggs. Lastly fold in almonds and flour.

Line 6 small pastry rings or darioles moulds. Take the frozen ganache out of freezer and cut into square chunks just smaller than your moulds. Spoon the mixture into the moulds till just over half full. Place a chunk of frozen Ganache in the centre of the mould and push down lights making sure it does not touch the sides . Spoon a little more mix over the top making sure they are completely covered. Place in an oven at 220 Celsius for approx 20 minutes, or until the sponge has set firmly on top. Carefully remove the fondant from its mould and serve immediately.

Enjoy

Thursday 13 May 2010

Frangipane

Frangipane is a pastry cream made up of ground almonds, eggs, flour, sugar and butter. It has a multitude of uses. The French use it in such desserts as tarte amandine aux poires, pithiviers and galettes where as the English use it for the base of the famous Bakewell tart. It can also be made with ground pistachios and hazelnuts and can even be mixed with Crème Patisserie (confectioners custard) to give it a looser and more velvety texture.

The history of frangipane can be traced back to the 16th-century. An Italian nobleman by the name of Marquis Muzio Frangipani invented a perfume for scenting gloves. This perfume was based on bitter almonds and proved to be so popular it inspired the pastry chefs of the time to produce a pastry cream that captured that same scent, for their desserts and pastries. They named it Frangipani.

Here’s my take on this classic dessert. I have substituted half the sugar for brown sugar to give it a richer, darker flavour and have added toasted oats which give it an interesting nutty flavour and courser texture.

Plum, blueberry and
toasted oat frangipane tart


For the pastry:— 75g caster sugar
— pinch salt
— 1 vanilla pod
— 150g soft butter
— 1 egg

For the frangipane:— 150g soft butter
— 100g caster sugar
— 50g dark brown sugar
— 3 eggs
— ½ tsp almond extract
— 150g oats
— 75g plain flour
— 25ml rum (optional)

— 1 punnet blueberries
— 2 ripe plums
— 2 tbsp raspberry jam
— honey to glaze

Preheat your oven to 160◦c.
For the pastry rub together the butter, sugar, vanilla and flour to resemble fine breadcrumb. Slowly add the egg to form dough. Wrap well in cling film and rest in fridge.

Make the frangipane. Beat the butter and sugar together until well combined. Add one
egg at a time and beat into the mix. Add the almonds, flour, rum (if using) and almond extract and mix well. Toast the oats in a pan on a low heat until they start to colour and add to the mix.

Roll out your pastry on a floured surface and line into a 9 inch tart case. Allow to rest for 1 hour. Line rested tart case with greaseproof paper and baking beans and blind bake in the oven for 15 minutes or until golden. Remove from oven and spread jam liberally over the bottom.

Fill with your frangipane mix, dot with quartered de-stoned plums and blueberries and put back in the oven for approx 30 minutes until golden and set. Glaze with warmed honey. ENJOY